
Are your planting beds starting to look tired even though you mulched just a few months ago? We get it; coastal heat, pop-up downpours, and everyday foot traffic can cause mulch to flatten and fade faster than most people expect. Left unchecked, the material intended to protect your soil can become a thin, matted layer that barely blocks weeds or retains moisture.
In this blog, you’ll learn how to maintain mulch so it continues to do its job, protecting roots, boosting curb appeal, and saving you from endless weekend chores. We’ll cover the why behind mulch upkeep, a straightforward checklist, seasonal tips, and common mistakes to avoid. Read on and reclaim those crisp, fresh beds that say someone cares about this property.
Why Mulch Maintenance Matters
A well-cared-for mulch blanket does more than look good; it actively works for you. Think of it as a living shield that insulates soil, locks in moisture, deters weeds, and feeds beneficial microorganisms. When that shield breaks down, plants stress out, and your water bill climbs.
If you’re a homeowner learning how to maintain mulch, remembering these payoffs makes the task feel worthwhile:
- Healthier root zones that stay cooler in summer and warmer in winter
- Fewer weeds stealing nutrients, which means less hand-pulling for you
- Slower evaporation, so irrigation systems run less often
- Richer soil structure as organic mulch decomposes into humus
Regular attention keeps each benefit humming and spares you the cost of a total re-mulch sooner than necessary.
A Practical Mulch Maintenance Checklist
Here, we share with you a step-by-step routine that you can follow every few weeks. Each task takes minutes but delivers months of return:
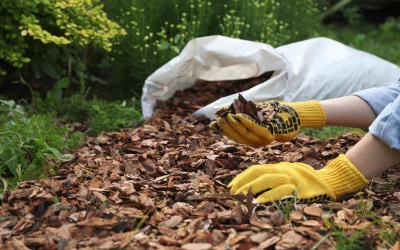
1) Inspect and Fluff Your Mulch Regularly
Walk your beds with a rake in hand. Lightly turn the top inch to break up clumps, shake out debris, and let air in. This “fluff” restores the mulch’s loft, allowing water to soak through instead of running off. While you’re at it, scan for mold or fungus and remove any trash that has blown in.
2) Keep the Depth Right
After fluffing, measure depth with a ruler. Two to three inches is the sweet spot for most ornamental beds. Less than that invites weeds; more can suffocate roots. If you’re low in spots, top them off—not the whole bed—so you maintain a uniform layer.
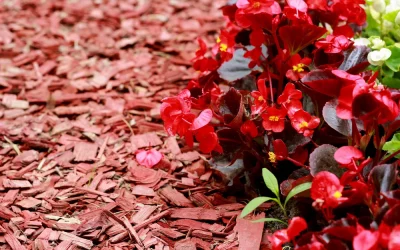
3) Replenish and Refresh Faded Mulch
Sun-bleached, compacted mulch no longer shields or enhances the beauty of your beds. So, how to keep mulch looking fresh as the seasons change? Order a half-yard or two to spot-fill bare areas and revive faded patches. A light annual top-dress restores color, depth, and texture—giving your landscape that just-installed look without the cost of a full replacement.
4) Watch for Weeds and Pests
Even the best mulch isn’t a force field. Pluck young weeds before they set seed, and inspect for insects nesting underneath. If you find ant colonies or termites near wooden structures, call a pro. A clean, dry, well-aerated mulch layer is less inviting to pests in the first place.
Seasonal Mulch Care Tips
Seasons change quickly along the Southeast coastline. But these quick tweaks per season can keep your mulch performing its best:
Spring
- Rake out winter sticks, leaves, and pine straw.
- Add fresh mulch early to protect seedlings from temperature swings.
- Incorporate a slow-release fertilizer before topping beds.
Summer
- Water deeply in the morning so the mulch dries by dusk, reducing the risk of fungus.
- Check depth monthly; heavy rains can wash material away.
- Pull weeds after storms—roots come out easier in damp soil.
Fall
- Fluff and spot-treat faded areas for a holiday-ready landscape.
- Inspect irrigation; drip lines should sit under, not above, the mulch.
- Use fallen leaves as an extra organic layer beneath your mulch cap.
Winter
- Top up to the full three inches for frost protection.
- Clear mulch off the crowns of perennials to prevent rot.
- Mark bed edges before freezes; it’s easier than chiseling later.
These seasonal adjustments demonstrate how to keep mulch looking fresh with minimal effort.
Common Mulch Mistakes to Avoid
A handful of pitfalls can undo all your good work. Steer clear of these:
- Piling mulch against tree trunks—creates moisture pockets that invite rot.
- Using plastic landscape fabric under organic mulch—it blocks nutrient exchange.
- Ignoring slope erosion—install edging or a thicker layer on inclines.
- Skipping aeration—compacted mulch repels water like a roof shingle.
- Delaying weed removal—tiny sprouts become tangled root mats fast.
Keeping these missteps in check ensures your landscaping mulching efforts stay effective and attractive.
Ready Beds, Happy Plants: Bella Mulch Makes It Easy
We’ve shared the day-to-day moves that keep mulch healthy, vibrant, and working hard for your landscape. Whether you manage a small garden or oversee a large-scale landscape, Bella Mulch can help.
From residential gardens in Beaufort to commercial campuses in Savannah, we stand on integrity, intentional accuracy, resiliency, pro-active communication, and a mindset to HAVE FUN! If you’re ready to simplify your landscaping with mulching, explore our range of mulch types and choose the one that best suits your garden.