
Have you ever knelt beside a perfectly mulched bed in Bluffton, trowel in hand, only to wonder if slicing straight through the mulch will suffocate your new marigolds? You’re not alone—the idea that mulch blocks roots from reaching the soil keeps many Carolina homeowners from upgrading their curb appeal.
In this blog, we’ll clear up that misconception and walk you through how to plant flowers in mulch without harming either soil or stems. You’ll know the right mulch depth, a step-by-step planting routine, after-care, and the common pitfalls that sabotage even experienced DIY gardeners. Ready to finally get color popping in those tidy beds? Let’s dig in.
Preparation: Assessing Mulch Depth and Type (Organic vs. Inorganic)
Before a single hole is dug, take two minutes to survey what’s already covering your soil. Aim for an even 2–3 inches of mulch; anything deeper can keep roots from settling, while a dusting won’t block weeds or hold moisture. A quick scratch test with your finger will tell you the thickness—if you hit soil almost immediately, you’ll want to top up before or after planting.
Next, identify whether you’re working with organic or inorganic material. Compost, shredded hardwood, and cedar mulch break down slowly, feeding the soil as they age. Stones and rubber chips, on the other hand, don’t decompose, but they can trap heat. Because organic options boost nutrients and regulate temperature, they’re the smarter pick for flower beds—especially if you plan to refresh color each season.
Step-by-Step Planting Process
Below you’ll find a clear sequence that turns raw root balls into vibrant blooms. Each stage is simple on its own; together, they guarantee successful transplanting in any Lowcountry yard.
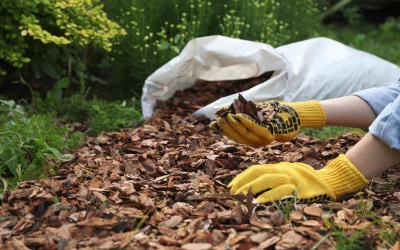
Clear a Wide Planting Zone
Push mulch away in a circle at least twice the diameter of the nursery pot. Exposing bare soil keeps debris from falling into the hole and lets you inspect moisture levels. If you’ve wondered, “Can flowers grow in mulch alone?”, this step shows why the answer is “not for long”—roots need direct soil contact.
Dig the Hole
Use a sharp spade to carve a hole as deep as the root ball and slightly wider. Break up the sides with your shovel to prevent glazing, which can cause roots to spiral rather than spread. In Hilton Head’s sandy loam, a sprinkle of compost at the bottom helps retain water without causing soggy feet.
Place and Position the Plant
Lower the plant gently, making sure the crown sits level with or just above the surrounding soil. Backfill halfway, firm lightly, water, then finish filling. This mid-fill drink eliminates air pockets and encourages immediate root-to-soil bonding—non-negotiable if you dream of hydrangeas as big as beach balls.
Replace the Mulch
Drag the mulch back, keeping it 1–2 inches away from the stem to avoid rot. Rebuild that 2–3-inch blanket, feathering the edges so water doesn’t run off like shingles on a roof. If you need to top up, you can always order mulch in bulk and have it blown in, saving you the wheelbarrow workout.
Water Thoroughly
Finish with a slow soak that penetrates the full root zone. A cheap moisture meter or your index finger will tell you when the top inch dries—a sign it’s time for another drink.
Common Mistakes to Avoid
Even seasoned gardeners slip up on the small stuff. The following sections spotlight errors that undo hours of effort.
Volcano Mulching
Mounding mulch against the trunk looks tidy but traps moisture where bark should breathe. Over time, it invites fungus and borers. Think doughnut, not volcano: a neat ring with an empty center.
Planting Too Deep
Burying the crown below grade causes stem rot and stunts growth. Always check that the top of the root ball is flush with the surrounding soil before replacing mulch.
Root Disturbance
Rough handling or teasing roots apart can cripple young plants. If the root mass is tight, slice vertically in three places; don’t shred. A gentle touch now means vigorous shoots later, perfect for that showy border next spring. Understanding how to plant plants in mulch the gentle way prevents most of these setbacks.
Post-Planting Care
Your flowers are tucked in. Keep them thriving with a simple regimen. A regular schedule keeps stress low and blooms high:
- Water every other day for the first two weeks; taper to twice weekly as roots knit.
- Apply a balanced, slow-release fertilizer after four weeks to prevent nutrient burn.
- Top-dress with an inch of compost at the start of each season for steady feeding.
- Inspect mulch monthly and fluff compacted spots; follow our guide to seasonal mulch maintenance.
- If you’re nurturing hydrangeas, switch to organic mulch for hydrangeas, like pine bark, to maintain the slightly acidic pH they crave.
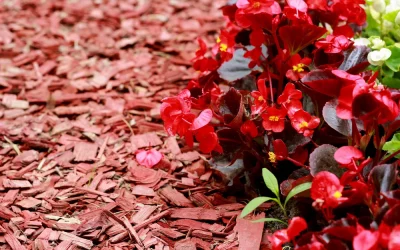
Benefits of Proper Mulching Around New Flowers
When mulch is installed and managed properly, it functions like a living blanket. The sections below break down exactly what that means for your garden.
Moisture Retention
That 2–3-inch layer slows evaporation, so you use less water, which matters in summer heat from Savannah to Charleston.
Weed Suppression
Blocking sunlight starves weed seeds, saving you from weekend hand-pulling marathons. Pair mulch with pre-emergent for iron-clad protection.
Soil Temperature Regulation
Mulch insulates soil, keeping roots cooler in July and warmer in January. This stability reduces transplant shock and extends flowering seasons.
Nutrient Cycling
As mulch decomposes, it releases organic matter that feeds microorganisms essential to plant health. For veggie beds, check our tips on organic mulch for a vegetable garden.
Curb Appeal Boost
A fresh layer of mulch instantly makes flower beds look intentional and well cared for, even before the plants fully fill in. Clean edges and consistent coverage help colors stand out instead of getting lost in bare soil or patchy groundcover. Using the right mulch for garden beds gives you that polished, magazine-ready look that quietly signals pride of ownership to anyone passing by.
Grow Bold with Bella Mulch
We’ve walked through every shovel turn, water break, and mulch fluffing technique needed to establish thriving flower beds across South Carolina and Georgia’s coast. At Bella Mulch, we live these steps daily, blowing in fresh material that meets our standards for Integrity, Intentional Accuracy, and—yes—a little fun. Because we produce and install mulch ourselves, you get consistent texture, exact coverage, and a process that respects your schedule.
Whether you’re refreshing azalea islands or designing a full-sun pollinator strip, our crew will deliver, spread, and clean up in a single visit. Now that you’ve mastered planting flowers in mulch, let us handle the heavy lifting so you can enjoy the blooms.